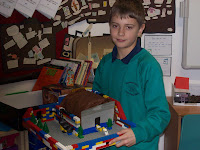
Thursday, 5 February 2009

Sophie-lou's Anderson Air-Raid

Over the past two weeks, for our home learning, we have been looking at Anderson Air-Raid Shelters and we have made our own.

I used...
a piece of cardboard for the structure and made some flaps to help it stand up.
a big piece of cardboard for the base.
some paper mache painted brown for the earth, mud and the soil.
two pieces of polystyrene and covered them in paper mache then painted it green and covered it in green crape paper.

Inside I put..
Three buckets for the chamber pot, the slosh bucket and the sink.
a flimsy curtain to go around the chamber pot.

Faisal's Anderson bomb shelter

My name is Faisal and this is how I made my Anderson bomb shelter.


first I cut a shoe box lid and any other piece of card I didn't need for my Anderson bomb shelter with scissors.


Next Iput holes in pieces of card and put toothpicks through them.


To make the bed I did just that but I cut a piece of sponge to make bedding and a piece of cloth to make a blanket.


I made a table just the same and put four toothpicks through the holes I pierced.


I also made a extra fire place.

Christopher's Air Raid Shelter!!!!!

For the past two weeks I have made my own Air Raid shelter! I had to look up what they had to bring with them. Then I had to see what they looked like. I planned and got my things to make it. In my opinion I could of put the shelter in the middle of the garden. I think the animals went well and the grass as you can see on the picture. My favourite bit was when I put the animals on and most of it was fun. I really enjoyed the whole thing.


Chloe's Anderson Shelter

Over the past 2 weeks we have been making our very own Anderson Air Raid Shelters for home learning. We researched all about them and then made them into a plan. After that we got down to making our fantastic shelters. Everyone came up with loads of great ideas to put with their shelters. Some people put vegetable patches and clothing lines and some people did small farms.

All the shelters looked amazing and very realistic, especially the fact they had a proper surrounding area. My favourite would have to be Alanah's because she put the house, animals, plants, vegetable patch, clothes line, wheelbarrow and lots more! Alanah would have to be very proud because I bet everyone agrees with me!

I made my Anderson shelter very carefully, with a small amount of limited help! Anyway, I made it by taking recycled objects and making them to my plan. I cut out things like trees and bushes and stuck them onto a piece of large cardboard. After making the main structure I painted it. As you can see the shelter was painted a metallic silver/gray, and my trees and bushes a green that i mixed with two or three colours. I had a great time making it and seeing all the other peoples shelters that they brought in.

I enjoyed evaluating mine and Alanah's shelter and I hope everyone had a fun time making them!
By Chloe x

Tom's Anderson Air Raid Shelter!!

The last two weeks, I have been and the whole of year 5 have been making Air Raid shelters. In my point of view I think every one's Air Raid shelters are better than MINE!!!!! Or maybe I am just being modest. Anyway here's a picture of my Air Raid shelter. Really its just made out of cardboard and paper!

Billy's air raid shelter

I made my air raid shelter by
  • making a Lego wall


  • Lego bushes


  • Lego stones


  • Lego people


  • a shoe box for the shelter


  • and brown tissue paper for soil

When I was making it I really enjoyed it.

The year 4s looked at our air raid shelters and lots of them liked mine.

Making air raid shelters are more fun than it looks so if you dont like making things make an air raid shelter.

By Billy

Luke's Anderson Shelter

I used all these materials to make my Anderson shelter.

  • thin cardboard

  • thick cardboard


  • corrugated cardboard
  • a twig

  • brown paint
  • black paint
  • green paint
  • glue gun or strong glue
  • grey paint
  • white paint

This is how i made it, First i got two thick peices of cardboard and stuck them together and that makes the base.

Then I made a template and cut it out and my dad used his glue gun to stick it down (get a responsible adult to do this).

Then I cut out a thin oblong with a curve on the top not a straight edge.

After get two thick peices of cardboard about 1cm wide and stick them down with glue with one edge up to the template and the back peice of the shelter (one on each side).

Then get a thin peice of cardboard and stick it with glue at the two sides and at the top of the shelter.

Next you will need to make a garden wall out of four pieces of thick cardboard,stick two together then stick the other two together, get some thin cardboard and cut it into strips the same size as the wall then stick one on one of the walls and the other on the other.

Now stick one wall on the left side of the base and one on the back of the base. Then do the same but make them lower and stick them on the other two sides they will be the ground level.

Now you will need to put paper mache in the base apart from in front of the door so that no edges on the shelter show.